C_S4CPB_2602 Online Test & C_S4CPB_2602 Fragenkatalog
Wiki Article
Falls Sie in der Prüfung durchgefallen sind nach der Nutzung der SAP C_S4CPB_2602 Dumps, können Sie volle Rückerstattung bekommen, womit Sie die Prüfungsunterlagen früher gekauft haben. Das ist die Garantie von ZertPruefung für alle Kunden. Diese Vorteile der ausgezeichneten Prüfungsunterlagen zur SAP C_S4CPB_2602 Zertifizierung sind nicht die Worten, sondern von allen Kunden geprüft. Die Prüfungsunterlagen von ZertPruefung werden seit langem immer geprüft. Die SAP C_S4CPB_2602 Prüfungsunterlagen von ZertPruefung sind die Ergebnisse der gesammelten Erfahrungen von IT-Eliten. Deshalb sind diese Dumps echt und die Unterlagen sind seit langem immer sehr populär.
ZertPruefung ist eine Website, die alle Ihrer Bedürfnisse zur SAP C_S4CPB_2602 Zertifizierungsprüfung abdecken kann. Mit den Prüfungsmaterialien von ZertPruefung können Sie die SAP C_S4CPB_2602 Zertifizierungsprüfung mit einer ganz hohen Note bestehen.
>> C_S4CPB_2602 Online Test <<
C_S4CPB_2602 Fragenkatalog, C_S4CPB_2602 Online Prüfung
Die SAP C_S4CPB_2602 Zertifizierungsprüfung zu bestehen ist nicht einfach. Die richtige Ausbildung zu wählen ist der erste Schritt zu Ihrem Erfolg. Und eine zuverlässige Informationensquelle zu wählen ist die Garantie für den Erfolg. ZertPruefung hat gute und zuverlässige Informationensquellen. Wenn Sie Produkte von ZertPruefung wählen, versprechen wir Ihnen nicht nur, die SAP C_S4CPB_2602 Zertifizierungsprüfung 100% zu bestehen, sondern Ihnen auch einen einjährigen kostenlosen Update-Service zu bieten.
SAP Certified - Implementation Consultant - SAP S/4HANA Cloud Public Edition (C_S4CPB_2602) C_S4CPB_2602 Prüfungsfragen mit Lösungen (Q11-Q16):
11. Frage
SIMULATION
Create a Custom Launchpad Space and Page
Business Scenario
You are building a custom business role that will be assigned to all employees in the organization. The business role and its corresponding Launchpad Space and Page need to include the apps that have been granted through the business catalogs assigned to the business role to ensure employees have an easy time finding the relevant applications.
Note: In the task below, always replace ###### with the last 6 digits of your group number.
Note:
Make sure to use the EXACT names/values/spaces as they are listed in the task.
Even forgetting a space or a number will cause the validation of the task to fail and be marked as incorrect.
Task:
Assign the business catalogs listed below to the business role and save:
HCM - Employee Self Service (SAP_HCM_BC_EMP_PC)
Concur - Employee Self-Service (SAP_CON_BC_CTE_ESS_PC)
Antwort:
Begründung:
See Explanation below for all solution
Explanation:
Objective
The purpose of this task is to assign the required business catalogs to the custom all-employee business role created in the previous task. These catalogs provide the applications that will later be shown in the launchpad space and page for all employees.
The catalogs that must be assigned are:
HCM - Employee Self Service
SAP_HCM_BC_EMP_PC
Concur - Employee Self-Service
SAP_CON_BC_CTE_ESS_PC
Business Scenario Explanation
In the previous task, you created a new custom all-employee business role, for example:
Z_EMPLOYEES_ALL_######
That role exists, but on its own it does not yet provide app access.
In SAP S/4HANA Cloud, app access is granted through business catalogs.
This means the role must now be connected to the catalogs that contain the apps employees need.
Later, these catalogs will feed the launchpad page content so end users can easily find the relevant applications.
Important Notes
Always replace ###### with the last 6 digits of your group number.
Use the exact catalog names and IDs.
Assign both required catalogs.
Save the role after assignment.
Do not assign the wrong catalog variant.
Required Catalogs
Assign exactly these two business catalogs:
Business Catalog
Business Catalog ID
HCM - Employee Self Service
SAP_HCM_BC_EMP_PC
Concur - Employee Self-Service
SAP_CON_BC_CTE_ESS_PC
Detailed Step-by-Step Procedure
Step 1: Open the app "Maintain Business Roles"
From the SAP S/4HANA Cloud launchpad:
Log in to SAP S/4HANA Cloud.
Use the app search.
Search for:
Maintain Business Roles
Open the app.
Explanation:
This app is used to maintain business roles, assign catalogs, assign launchpad spaces, and maintain restrictions.
Step 2: Search for your custom all-employee business role
Inside Maintain Business Roles:
Search for your business role ID:
Z_EMPLOYEES_ALL_######
Example
If your suffix is 000013, search for:
Z_EMPLOYEES_ALL_000013
Open the role.
Explanation:
You must open the custom all-employee role created in the previous task, not a template role and not a standard SAP role.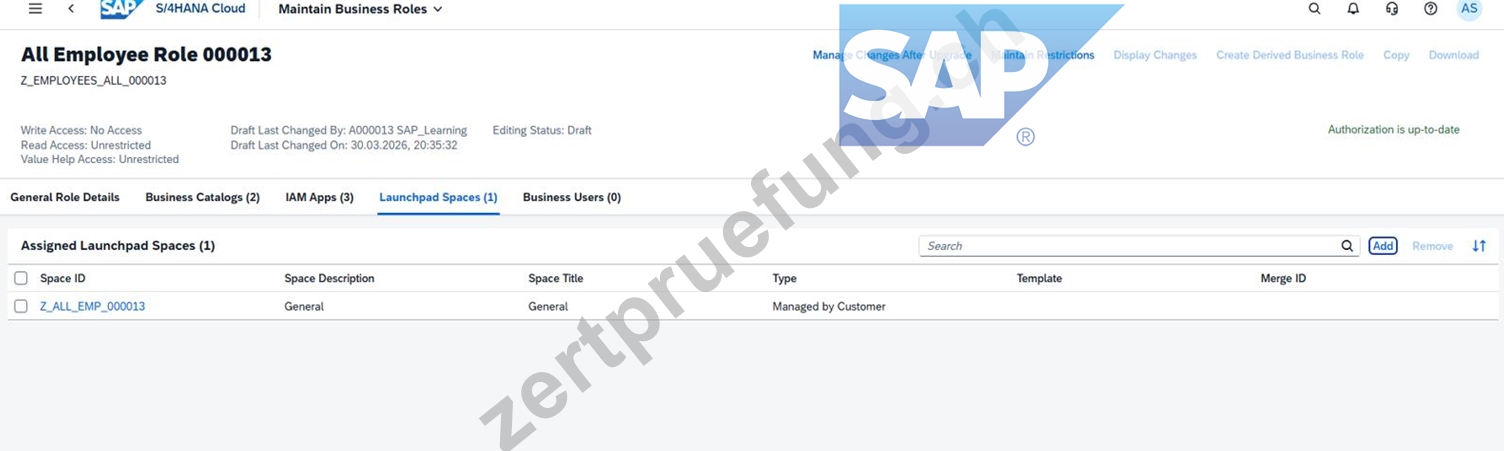
Step 3: Verify the correct role is open
Confirm that the role details show:
Business Role ID = Z_EMPLOYEES_ALL_######
Business Role Description = All Employee Role ######
Explanation:
This ensures you are assigning catalogs to the correct business role.
Step 4: Go to the "Business Catalogs" tab
Inside the role:
Click the tab:
Business Catalogs
Explanation:
This tab is used to assign the business catalogs that define which apps and app authorizations the role provides.
Step 5: Click Add
In the Assigned Business Catalogs section:
Click Add
This opens the dialog:
Add Business Catalogs
Explanation:
The Add popup is used to search for and assign SAP-delivered business catalogs to the custom role.
Step 6: Search for the first catalog
In the Add Business Catalogs popup:
Search for:
SAP_HCM_BC_EMP_PC
or
HCM - Employee Self Service
Select:
HCM - Employee Self Service
Business Catalog ID: SAP_HCM_BC_EMP_PC
Explanation:
This catalog provides employee self-service apps and is required by the task.
Step 7: Search for the second catalog
Still in the Add Business Catalogs popup:
Search for:
SAP_CON_BC_CTE_ESS_PC
or
Concur - Employee Self-Service
Select:
Concur - Employee Self-Service
Business Catalog ID: SAP_CON_BC_CTE_ESS_PC
Explanation:
This catalog provides the Concur employee self-service content and is also explicitly required by the task.
Step 8: Add the selected catalogs
After selecting both catalogs:
Click OK or Apply
Explanation:
This adds the selected catalogs to the custom role in draft mode.
Step 9: Verify both catalogs are listed
Back in the Business Role screen, verify that both assigned catalogs are visible:
SAP_HCM_BC_EMP_PC
SAP_CON_BC_CTE_ESS_PC
Explanation:
This confirms that the required app authorizations have now been attached to the role.
Step 10: Save the role
Click:
Save
Explanation:
This finalizes the catalog assignment.
Without saving, the catalogs remain only in draft and the role will not provide the required app content.
Step 11: Verify the result after save
After saving, check again that the role still shows both business catalogs in the assigned list.
Explanation:
This confirms the task was completed successfully and the role is ready for the next step, which is launchpad space/page content.
Expected Result
After this task is completed successfully:
the custom all-employee role has both required business catalogs assigned, the role is saved successfully, the role now provides the app authorizations required for employee self-service content, the launchpad page can later use these catalogs to add the required tiles.
12. Frage
SIMULATION
Create a Business User and Assign a Business Role
Business Scenario
You are working on an implementation project and need to create a test user in the system for demonstrating the professional services business processes to project managers during your upcoming Fit-to-Standard workshop. Follow the instructions below to create a new test user with a basic import of worker and work agreement data.
Note: In the task below, always replace ###### with the last 6 digits of your group number.
Note:
Make sure to use the EXACT names/values/spaces as they are listed in the task.
Even forgetting a space or a number will cause the validation of the task to fail and be marked as incorrect.
Task:
Assign the HR Administrator (BR_ADMINISTRATOR_HRINFO) business role to your user.
Antwort:
Begründung:
See Explanation below for all solution
Explanation:
Task 3: Assign the HR Administrator Business Role to Your User
Objective
The purpose of this task is to assign the HR Administrator business role to your own business user so you can continue the worker, work agreement, and business user setup activities required for the professional services scenario.
The required business role is:
Business Role ID: BR_ADMINISTRATOR_HRINFO
Business Role Description: Administrator - HR Info
Step 1: Open the app "Maintain Business Users"
From the SAP S/4HANA Cloud launchpad:
Log in to SAP S/4HANA Cloud.
Use the app search or launchpad search.
Search for:
Maintain Business Users
Open the app.
Explanation:
This app is used to maintain user master data and assign business roles.
All business role assignments for your own user are done here.
Step 2: Search for your own user
In Maintain Business Users:
In the filter/search area, enter your own user name or user ID.
Click Go.
Explanation:
You need to open your own user because the HR Administrator role must be assigned to your own account before continuing the simulation.
Step 3: Open your user record
After the search results appear:
Click your own user in the result list.
Open the detail page.
Explanation:
This opens the business user detail screen where all assigned roles can be reviewed and maintained.
Step 4: Switch to Edit mode
On the user detail page:
Click Edit.
Explanation:
Edit mode is required before you can add or remove business roles.
Without edit mode, the Assigned Business Roles tab is display-only.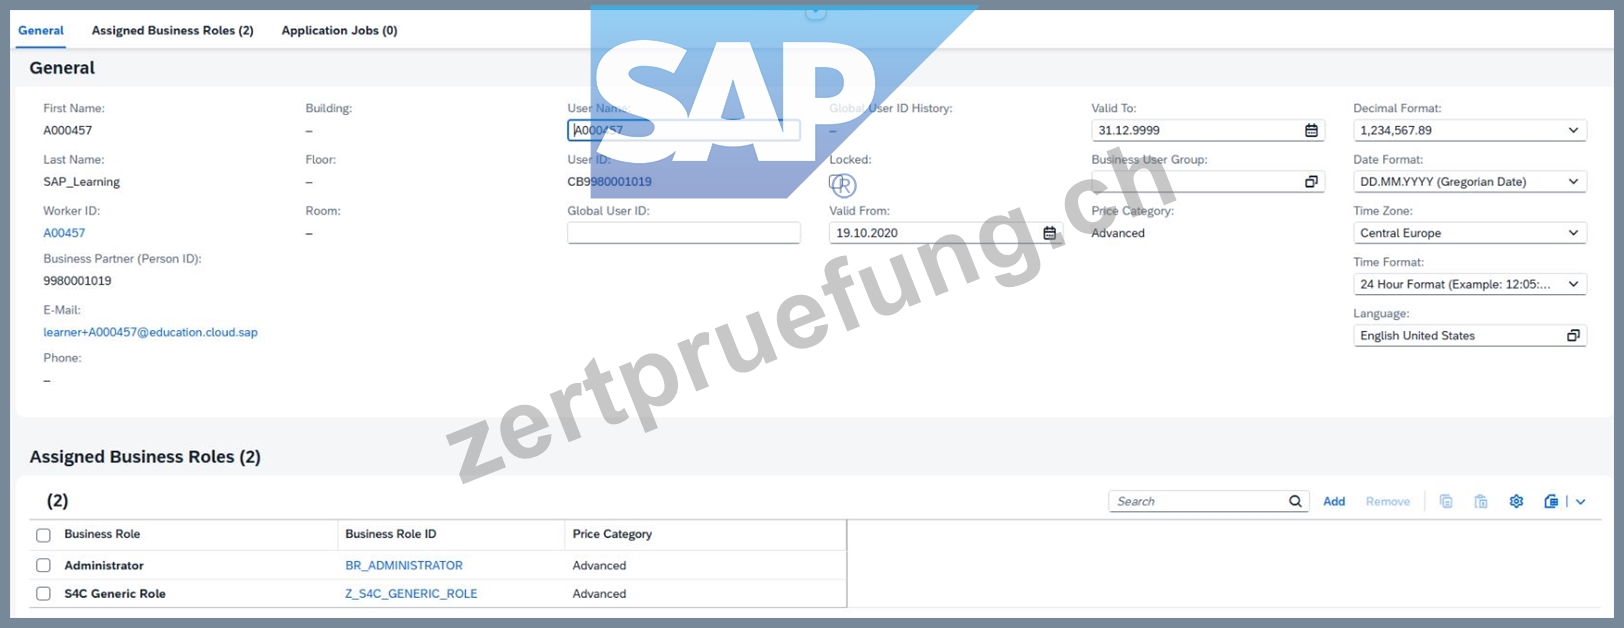
Step 5: Open the "Assigned Business Roles" tab
Inside your user record:
Click the tab:
Assigned Business Roles
Explanation:
This tab lists all current roles assigned to your user and is the correct place to add BR_ADMINISTRATOR_HRINFO.
Step 6: Click "Add"
In the Assigned Business Roles section:
Click Add
This opens the dialog:
Add Business Roles
Explanation:
This popup allows you to search for standard SAP business roles by ID or description.
Step 7: Search for the HR Administrator role
In the Add Business Roles popup:
In Business Role ID, enter:
BR_ADMINISTRATOR_HRINFO
Click Go
Select the role:
Administrator - HR Info
Business Role ID: BR_ADMINISTRATOR_HRINFO
Explanation:
This is the exact role required by the task.
It gives you the workforce / HR information administration permissions needed for the later simulation steps.
Step 8: Add the role to the user
After selecting the role:
Click OK or Apply
The role should now appear in your assigned roles list.
Explanation:
At this stage, the role is added to the user in draft mode, but it is not yet permanently stored until you save.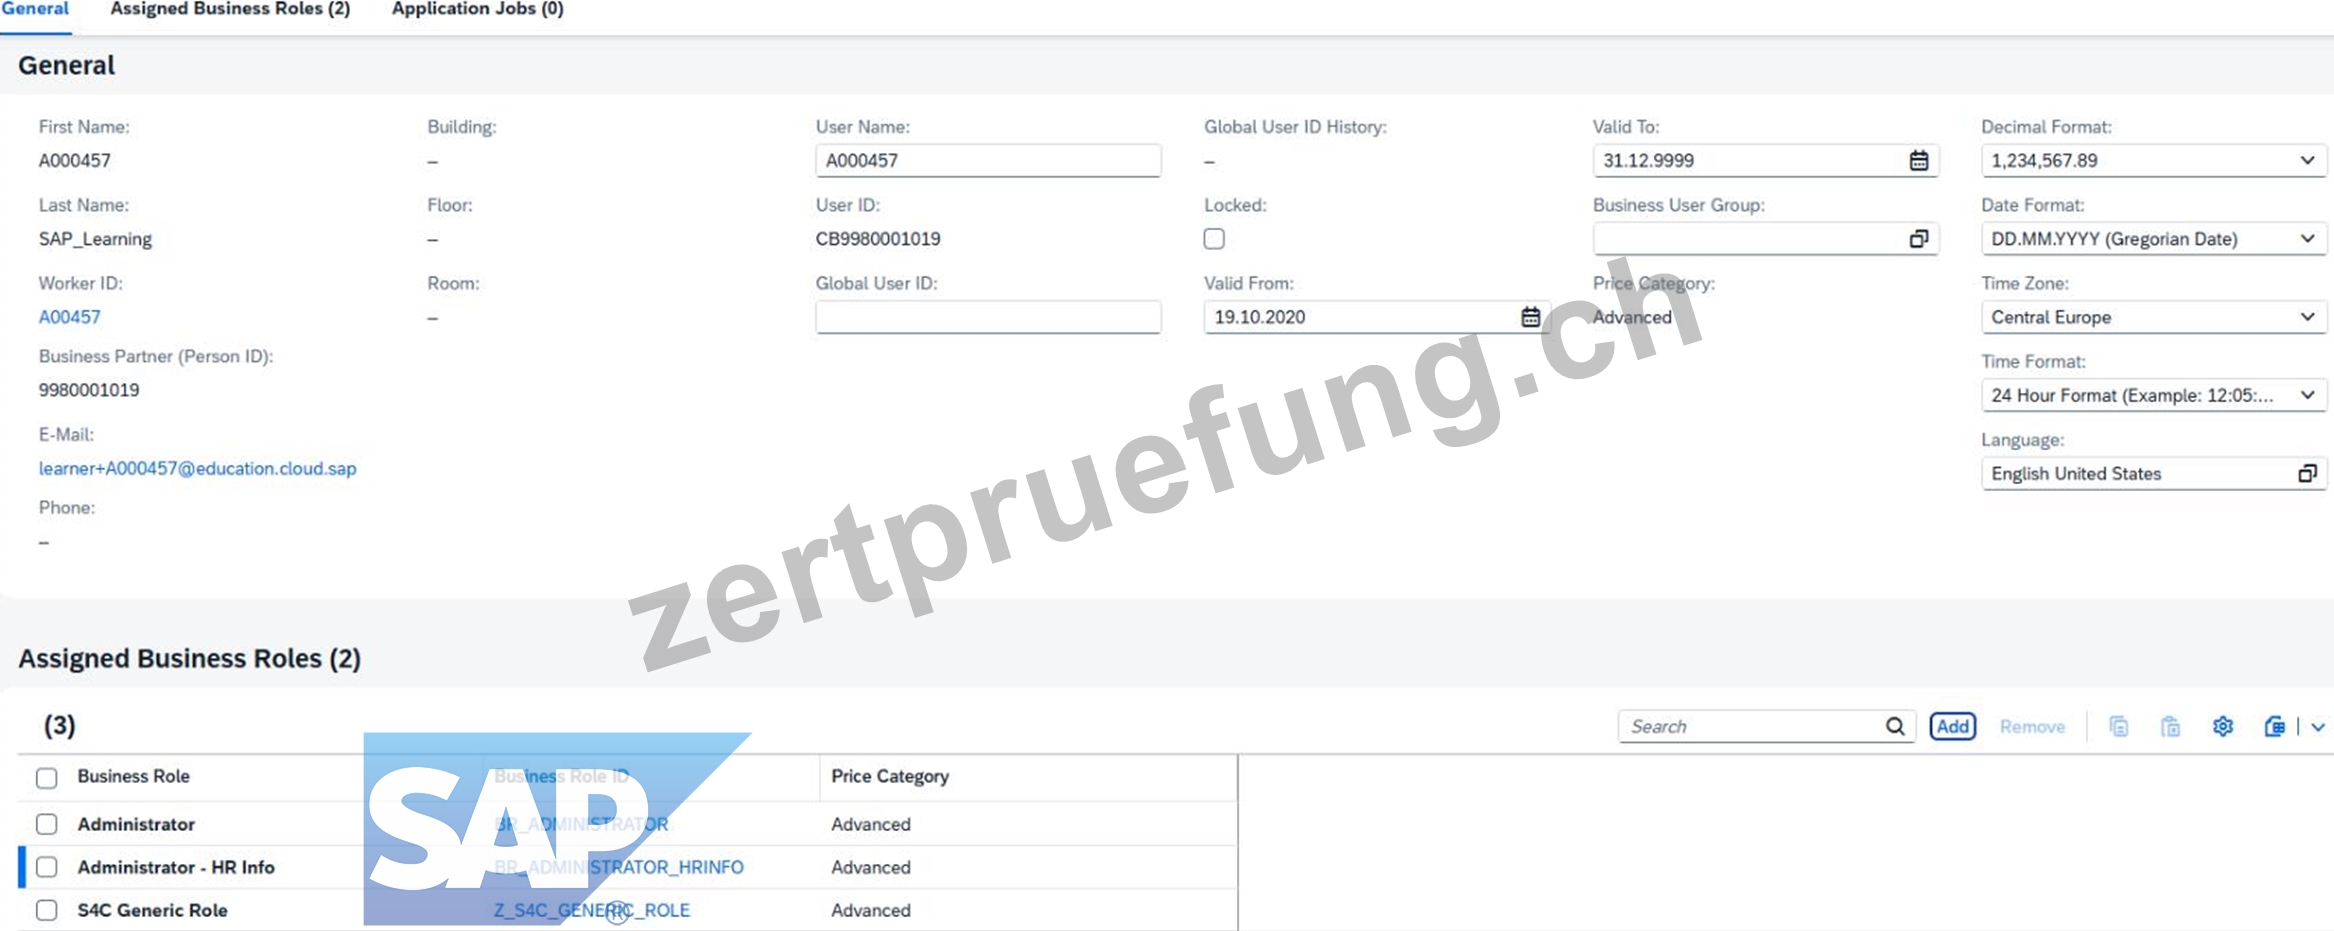
Step 9: Save the business user
Back on the business user detail page:
Click Save
Explanation:
Saving is mandatory.
If you do not save, the role assignment remains incomplete and later tasks may fail because your user will not actually have the HR Administrator authorization.
Step 10: Verify the role assignment
After saving, verify that the role appears in the assigned roles list:
BR_ADMINISTRATOR_HRINFO
Administrator - HR Info
Explanation:
This is your proof that the task is complete.
You should see the HR role together with your other assigned roles.
Expected Result
After completing this task successfully:
your user has the HR Administrator role assigned,
the role appears in Assigned Business Roles,
the user is saved successfully,
later worker/business-user creation steps can be performed.
Why this role matters
The role BR_ADMINISTRATOR_HRINFO is required because the scenario involves:
worker information,
work agreement information,
user creation for workshop demonstration,
HR-related administration steps.
In SAP S/4HANA Cloud, access is always role-based, so assigning this role is an authorization prerequisite for later tasks.
13. Frage
SIMULATION
Set up an Integration Scenario
Business Scenario
You are responsible for setting up the Bank Integration with File Interface (1EG). During an actual implementation, you would first download the Set-up Instructions for the business process from SAP Signavio Process Navigator. In this practical exam, all the information will be provided to you, so you do not need to download the Set-up Instructions.
Prerequisites
Note:
In the task below, always replace ###### with the last 6 digits of your group number.
Note:
Make sure to use the EXACT names/values/spaces as they are listed in the task. Even forgetting a space or a number will cause the validation of the task to fail and be marked as incorrect.
Your Task
Create a Communication System with the information listed below and save.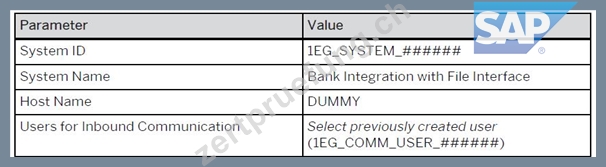
Antwort:
Begründung:
See Explanation below for all solution
Explanation:
Objective
The purpose of this task is to create a Communication System for the integration scenario Bank Integration with File Interface (1EG).
This communication system will later be used in the communication arrangement and will reference the communication user created in the previous task.
Business Scenario Explanation
In this scenario, you are setting up:
Bank Integration with File Interface (1EG)
In SAP S/4HANA Cloud, the technical setup typically requires:
a Communication User
a Communication System
a Communication Arrangement
In Task 13, you created the communication user.
In Task 14, you now create the communication system and link that previously created communication user for inbound communication.
The communication system represents the external or technical integration partner definition used in the scenario.
Important Notes
Always replace ###### with the last 6 digits of your group number.
Use the exact values shown in the task.
Do not change capitalization, underscores, or spacing.
The communication user assigned in this task must be the one created in the previous step:
1EG_COMM_USER_######
Required Values
Use the following values exactly as shown in the task image.
Example
If your suffix is 000013, then the values become:
System ID = 1EG_SYSTEM_000013
System Name = Bank Integration with File Interface
Host Name = DUMMY
Inbound Communication User = 1EG_COMM_USER_000013
Step 1: Open the app "Communication Systems"
From the SAP S/4HANA Cloud launchpad:
Log in to SAP S/4HANA Cloud.
Use the search bar or app finder.
Search for:
Communication Systems
Open the app.
Explanation:
This app is used to create and maintain technical communication systems for integration scenarios.
Because the task explicitly asks to create a Communication System, this is the correct app.
Step 2: Start creating a new Communication System
Inside the Communication Systems app:
Click:
New
Explanation:
This starts the creation of a new communication system record.
Step 3: Enter the System ID
In the communication system creation screen, enter:
System ID = 1EG_SYSTEM_######
Example
If your suffix is 000013, enter:
1EG_SYSTEM_000013
Explanation:
This is the technical ID of the communication system.
It must exactly match the task requirement.
Step 4: Enter the System Name
In the System Name field, enter exactly:
Bank Integration with File Interface
Explanation:
This is the descriptive name of the communication system and must be entered exactly as provided.
Step 5: Enter the Host Name
In the Host Name field, enter exactly:
DUMMY
Explanation:
For this simulation, the host is not a real productive endpoint.
The task explicitly requires the placeholder value DUMMY.
Step 6: Maintain the inbound communication user
Locate the section for:
Users for Inbound Communication
Then:
Click Add or select the entry field/value help
Choose the communication user created in the previous task:
1EG_COMM_USER_######
Example
If your suffix is 000013, select:
1EG_COMM_USER_000013
Explanation:
This is a critical link between the communication user and the communication system.
Without assigning the previously created communication user, the communication system setup is incomplete.
Step 7: Verify the inbound user assignment
After adding the inbound communication user, confirm that the selected user is:
1EG_COMM_USER_######
Explanation:
This confirms that the system will use the correct technical user for inbound communication in the later communication arrangement.
Step 8: Review all entered values
Before saving, check the following:
System ID = 1EG_SYSTEM_######
System Name = Bank Integration with File Interface
Host Name = DUMMY
Users for Inbound Communication = 1EG_COMM_USER_######
Explanation:
This review helps avoid validation issues caused by incorrect naming, missing underscores, or selecting the wrong communication user.
Step 9: Save the Communication System
Click:
Save
Explanation:
This finalizes the creation of the communication system.
Without saving, the communication system will not exist for the next task.
Step 10: Verify the saved Communication System
After saving, confirm that the communication system exists and displays the correct values:
1EG_SYSTEM_######
Bank Integration with File Interface
Host = DUMMY
inbound user = 1EG_COMM_USER_######
Explanation:
This confirms the system is successfully created and ready for the communication arrangement setup in the next step.
Expected Result
After this task is completed successfully:
the communication system exists,
the system ID matches the required naming pattern,
the system name is correct,
the host name is DUMMY,
the previously created communication user is assigned for inbound communication, the system is saved successfully.
14. Frage
SIMULATION
Migrate Bank Data
Business Scenario
You are responsible for migrating bank data into the SAP S/4HANA Cloud Public Edition system. You have determined the best method is Migrate Data Using Staging Tables, as you only have a couple banks to migrate.
Prerequisites:
Note:
In the task below, always replace ###### with the last 6 digits of your group number.
Note:
Make sure to use the EXACT names/values/spaces as they are listed in the task. Even forgetting a space or a number will cause the validation of the task to fail and be marked as incorrect.
Task:
Migrate the bank data listed below.
Table 1: Bank 1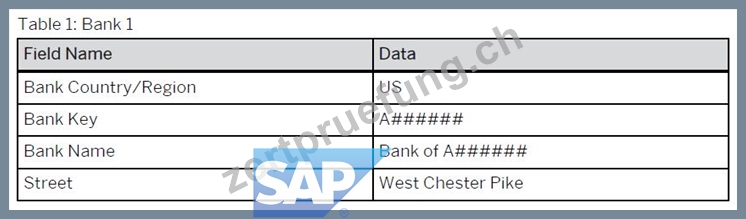

Antwort:
Begründung:
See Explanation below for all solution
Explanation:
Objective
The purpose of this task is to migrate two bank master records into SAP S/4HANA Cloud Public Edition using the Migrate Data Using Staging Tables approach.
This task is performed inside the migration project created earlier:
Migration Project Name: Bank Data ######
Migration Object: Bank
The bank master data must be entered exactly as provided in the task tables.
Business Scenario Explanation
In this scenario, you are responsible for loading a small number of bank records into the system. Because there are only two banks to migrate, the selected migration method is:
Migrate Data Using Staging Tables
This method requires you to:
open the existing migration project,
download the Bank templates,
populate the required CSV file with the bank data,
upload the files,
validate the data,
transfer the data to staging tables,
complete any required mapping tasks,
migrate the bank instances,
verify the migrated banks in the target app.
Important Notes
Always replace ###### with the last 6 digits of your group number.
Use the values exactly as shown in the task.
Keep names, spaces, and numbers exactly correct.
During your execution, mappings may be required for:
Country/Region Key
Language Key (ISO)
Regional Code
Bank Key
If regional text values like Pennsylvania or Georgia are rejected, mapping may be needed to:
PA
GA
Example
If the suffix is 000013, the values become:
Bank 1
Bank Country/Region = US
Bank Key = A000013
Bank Name = Bank of A000013
Street = West Chester Pike
House Number = 3999
City = Newtown Square
Postal Code = 19073
Country/Region = US
Language = EN
Location = Pennsylvania
Bank 2
Bank Country/Region = US
Bank Key = Z000013
Bank Name = Bank of Z000013
Street = Lenox Road
House Number = 3580
City = Atlanta
Postal Code = 30326
Country/Region = US
Language = EN
Location = Georgia
Detailed Step-by-Step Procedure
Step 1: Open the app "Migrate Your Data"
From the SAP S/4HANA Cloud launchpad:
Log in to SAP S/4HANA Cloud.
Search for:
Migrate Your Data
or
Migration Projects
Open the app.
Explanation:
This app is the migration cockpit where the project and Bank migration object are maintained.
Step 2: Open the migration project
In the migration projects list:
Search for your project:
Bank Data ######
Open the project.
Example
If your suffix is 000013, open:
Bank Data 000013
Explanation:
This is the migration project created in the previous task and it contains the migration object Bank.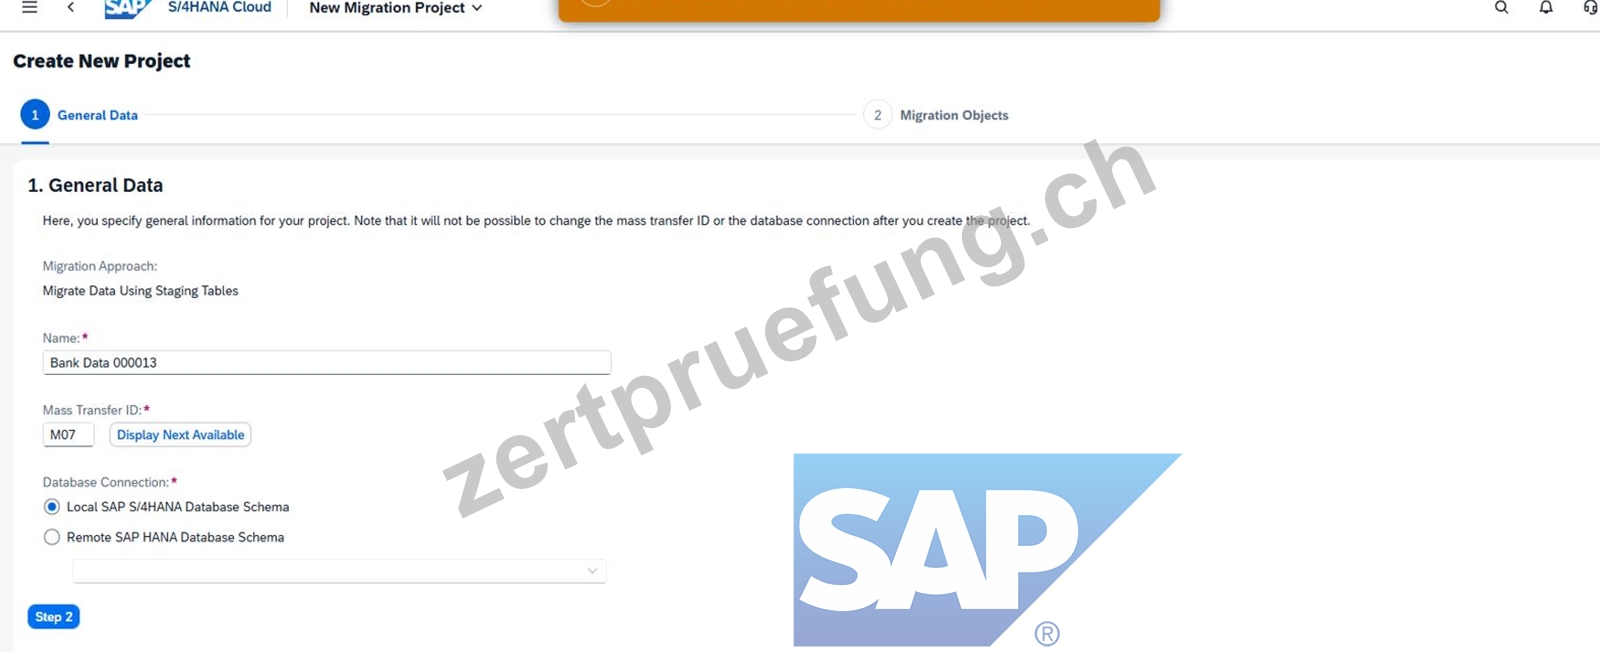
Step 3: Open the Bank migration object
Inside the migration project:
Locate the migration object:
Bank
Open it.
Explanation:
The Bank migration object is where the templates, uploads, mapping tasks, and migration instances are handled.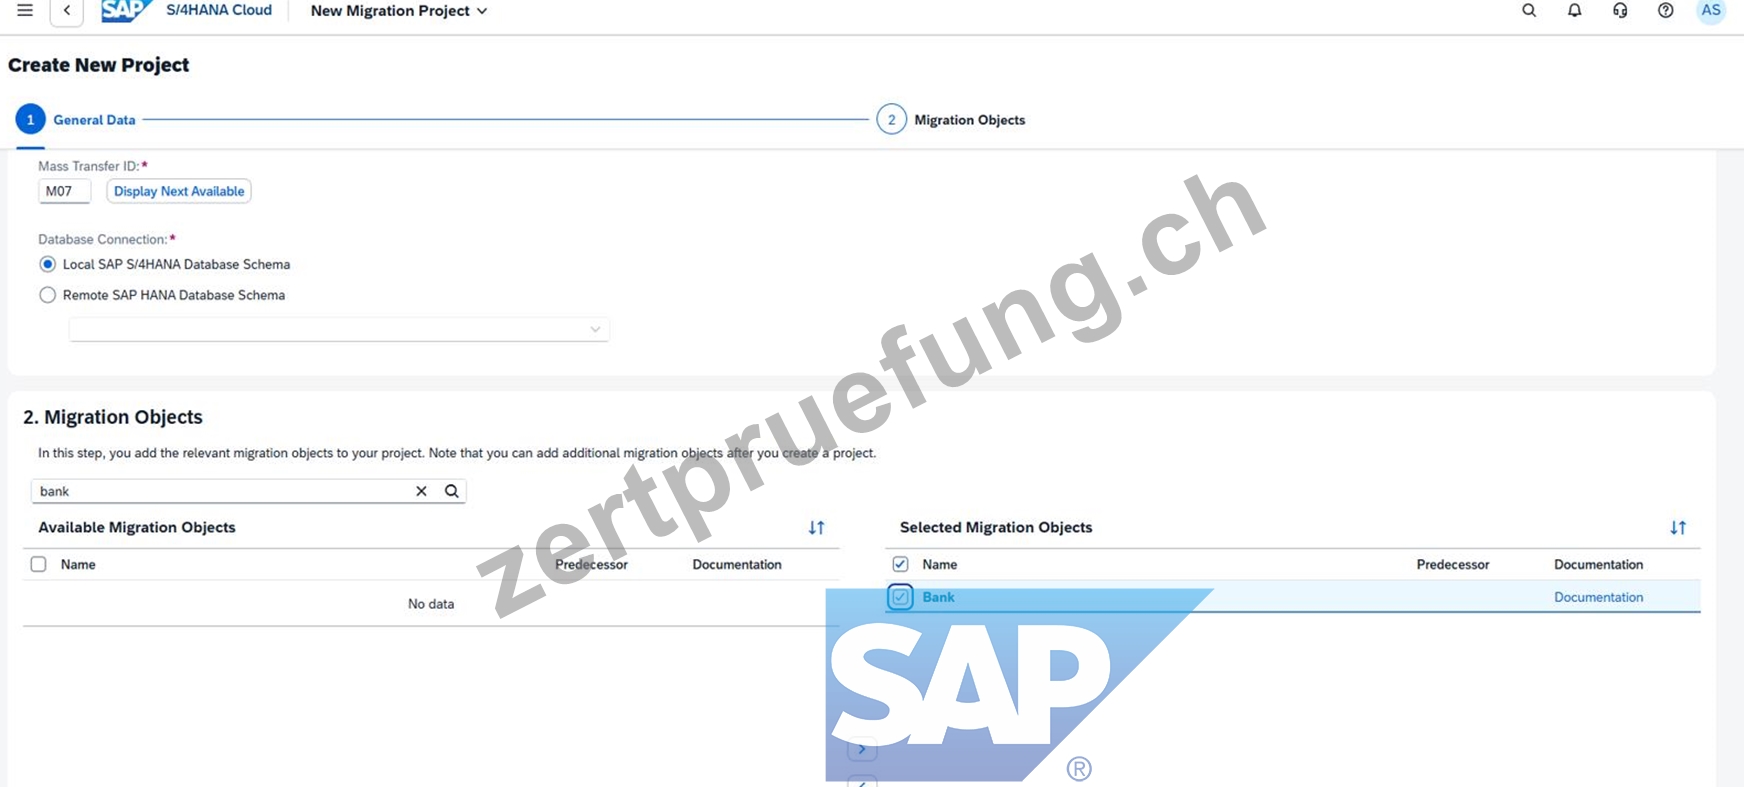
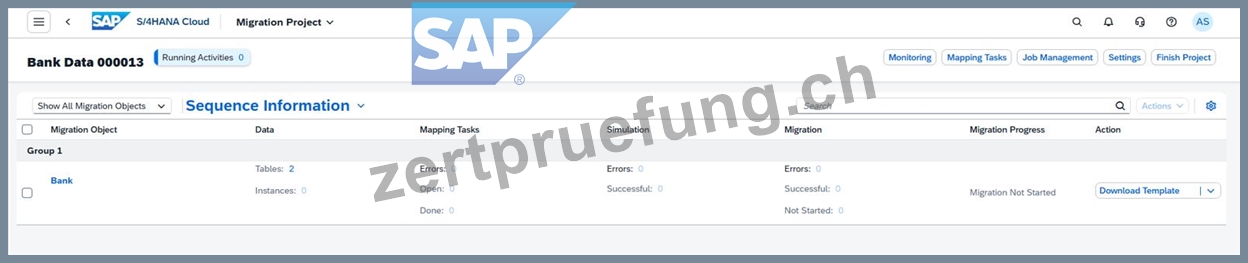
Step 4: Download the template files
On the Bank migration object screen:
Click:
Download Template
This provides the CSV template files needed for migration.
Explanation:
For the Bank migration object, the main files typically include:
S_BNKA#FreeText_Mandatory.csv
S_SCRIPT_ADRC#FreeText.csv
The mandatory file contains the bank master structure; the second file is optional for international address versions.
Step 5: Populate the mandatory Bank CSV file
Open the mandatory CSV file:
S_BNKA#FreeText_Mandatory.csv
Enter the two bank records exactly as required from the task tables.
Explanation:
This file must contain the bank master data that will be loaded into the staging tables.
The data must match the required values exactly.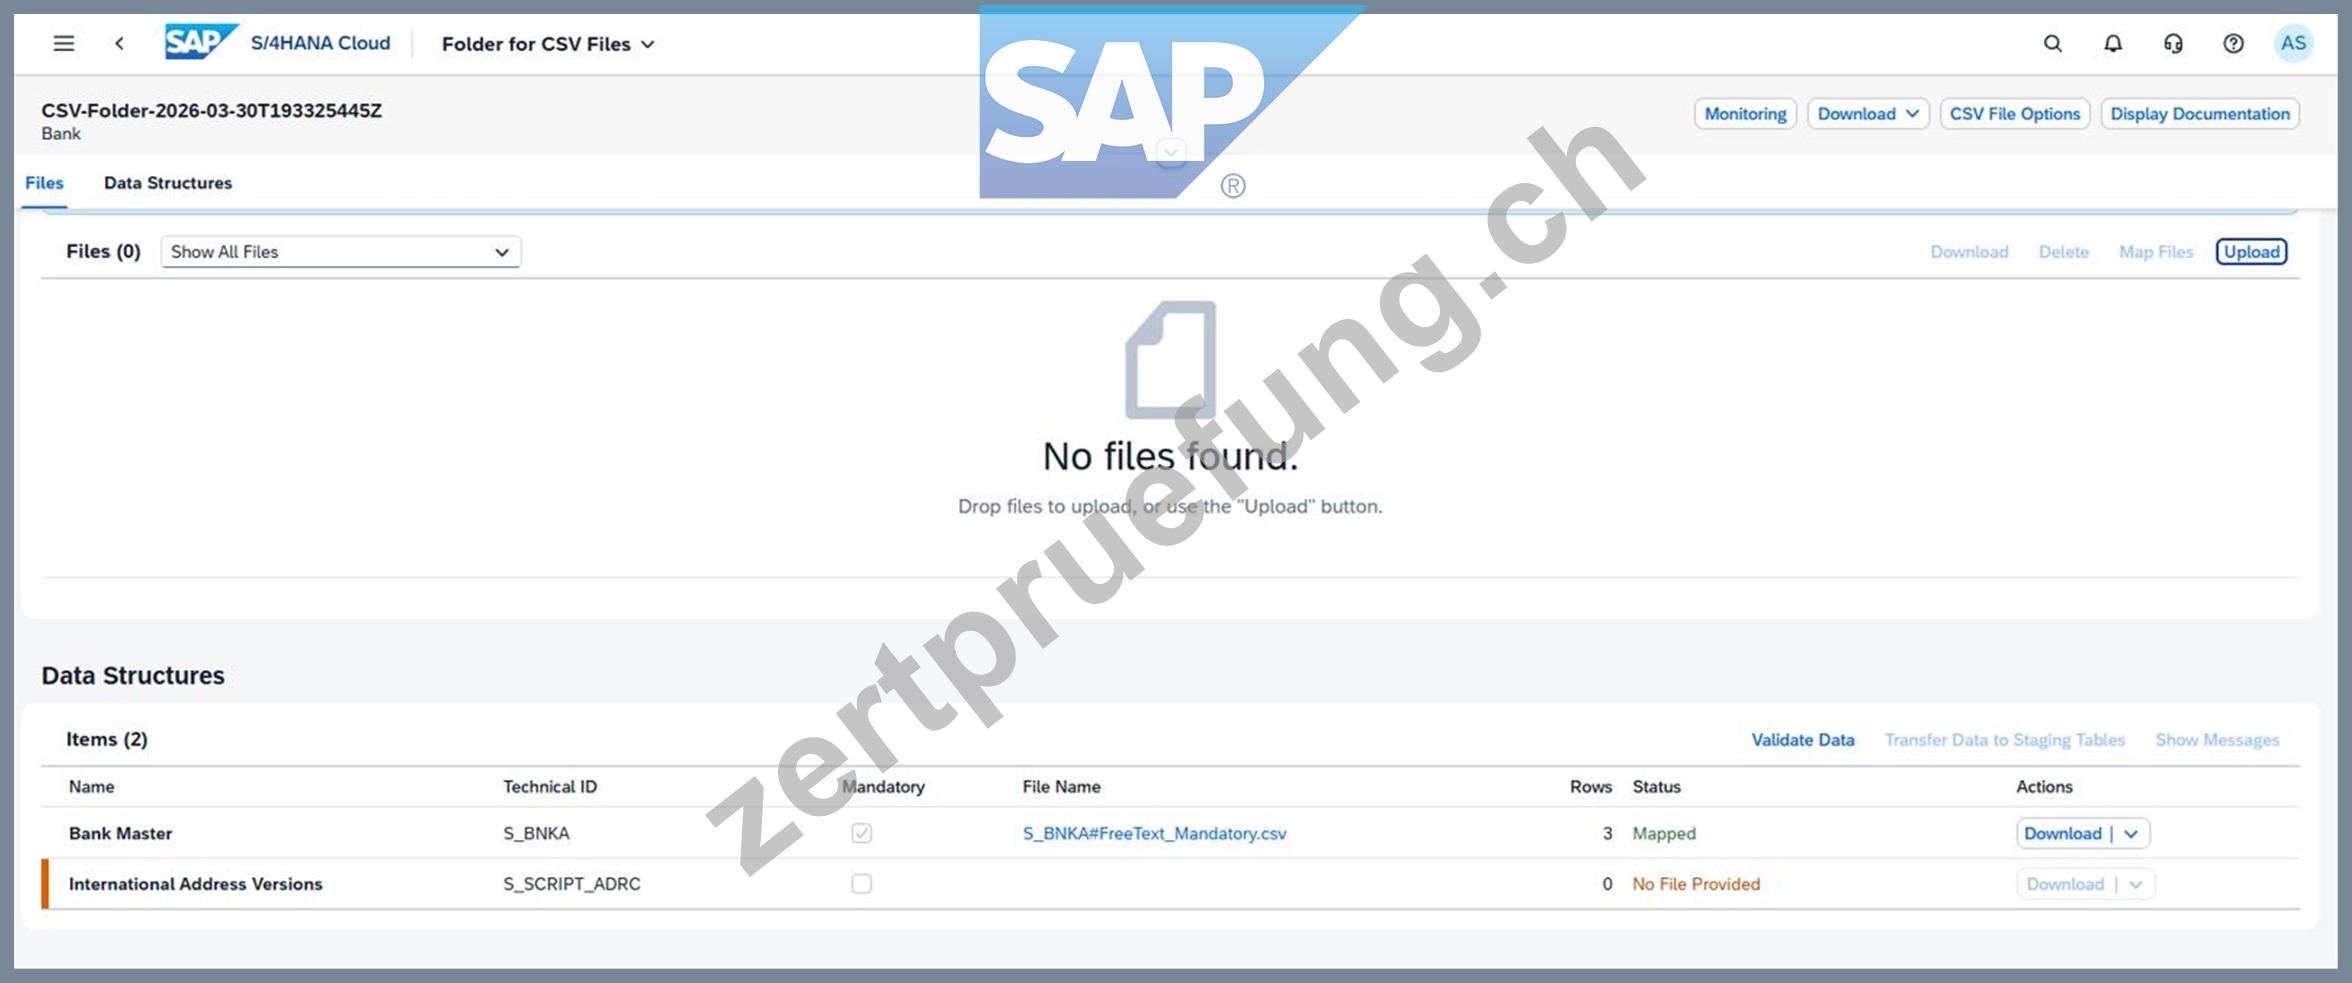
Step 6: Use the correct values in the Bank CSV
Populate the mandatory file with the two records.
Bank 1
Bank Country/Region = US
Bank Key = A######
Bank Name = Bank of A######
Street = West Chester Pike
House Number = 3999
City = Newtown Square
Postal Code = 19073
Country/Region = US
Language = EN
Location = Pennsylvania
Bank 2
Bank Country/Region = US
Bank Key = Z######
Bank Name = Bank of Z######
Street = Lenox Road
House Number = 3580
City = Atlanta
Postal Code = 30326
Country/Region = US
Language = EN
Location = Georgia
Explanation:
These values create two bank master records, one beginning with key A###### and the other with key Z######.
Step 7: Keep the optional international address file empty if not needed For the file:
S_SCRIPT_ADRC#FreeText.csv
leave it with header only if no separate international address version data is required.
Explanation:
During your execution, the optional file was not required and the Bank migration still proceeded because only the mandatory Bank Master structure had to be populated.
Step 8: Open Upload Files
In the Bank migration object:
Go to:
Upload Files
Explanation:
This is where the CSV folder is created and the files are uploaded to the migration cockpit.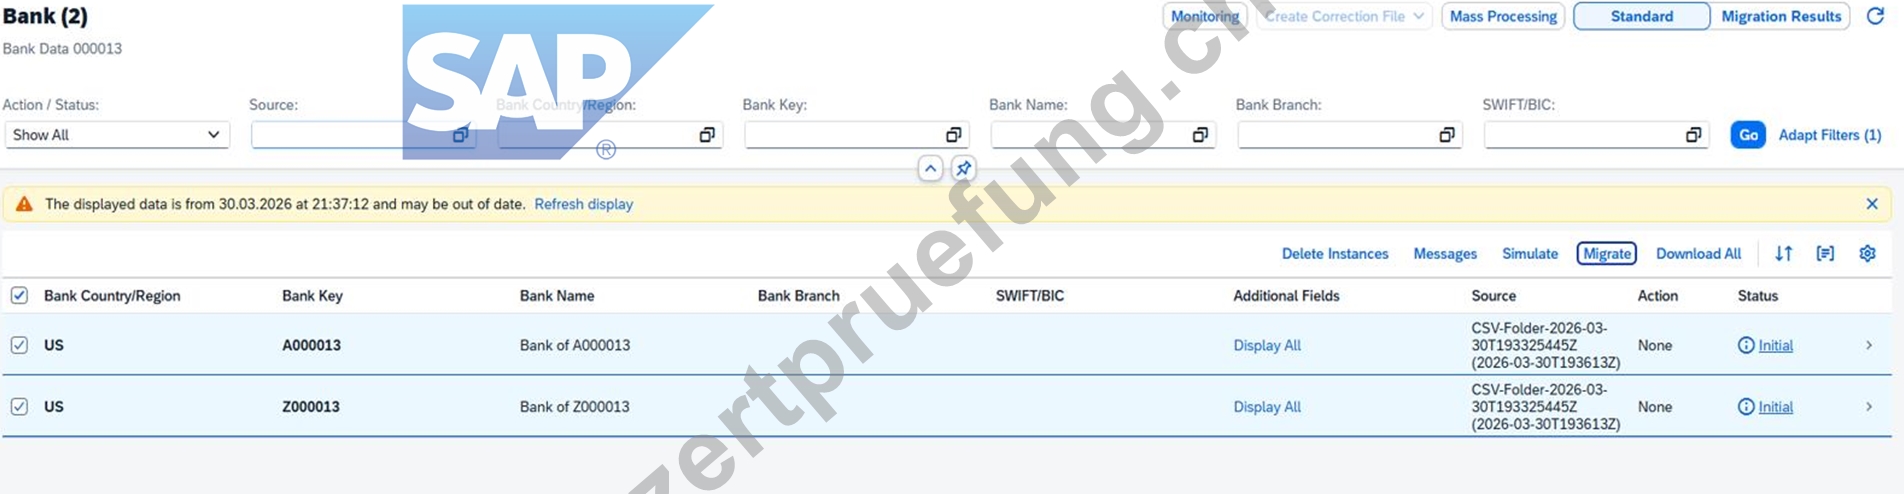
Step 9: Create a CSV Folder
Click:
Create CSV Folder
Explanation:
When using CSV with staging tables, SAP groups the upload into a CSV folder structure.
Step 10: Upload the CSV files
Upload:
S_BNKA#FreeText_Mandatory.csv
S_SCRIPT_ADRC#FreeText.csv (optional / empty if not used)
Explanation:
The mandatory file is required.
The optional file may remain empty or not provided depending on the migration object's structure.
Step 11: Validate the data
After upload:
Click:
Validate Data
Explanation:
This checks:
file readability,
required columns,
correct structure,
duplicate keys,
and data consistency.
Step 12: Correct any file or format errors if needed
During execution, common issues included:
wrong file mapping,
UTF-8 / CSV reading problems,
missing mandatory fields,
duplicate key values,
region value mismatches.
Explanation:
You must resolve validation errors before continuing to staging tables.
Examples from your run:
duplicate key values had to be corrected,
file structure mapping had to be adjusted,
CSV encoding had to be corrected.
Step 13: Transfer data to staging tables
After validation is successful, click:
Transfer Data to Staging Tables
Explanation:
This moves the validated CSV data into SAP's staging tables so the Bank migration object can create migration instances.
Step 14: Go to Mapping Tasks if required
If the system shows mapping tasks, open:
Mapping Tasks
Explanation:
For your run, the following mappings had to be confirmed:
Country/Region Key
Language Key (ISO)
Regional Code
Bank Key
Step 15: Maintain mapping values
If mappings appear, confirm or maintain them as follows:
Country/Region Key
source US → target US
Language Key (ISO)
source EN → target EN
Regional Code
If text values are shown:
source Pennsylvania → target PA
source Georgia → target GA
Bank Key
Confirm the system-generated source values to the correct target values for:
A######
Z######
Explanation:
These mappings are required when the migration object needs target-system value confirmation before posting the records.
Step 16: Confirm the mapping tasks
After maintaining the mappings:
Click:
Confirm
Explanation:
All mapping task statuses should change to Confirmed before running migration again.
Step 17: Open the Bank instances
Return to the Bank migration object and open:
Instances
Explanation:
This screen shows the individual bank records created from the staging-table data.
Step 18: Select the bank instances
Select both bank records.
Expected rows:
US / A######
US / Z######
Explanation:
Both bank records must be selected so they can be migrated into the target system.
Step 19: Click Migrate
Click:
Migrate
Explanation:
This starts the actual creation of bank master records in the target SAP S/4HANA Cloud system.
Step 20: Resolve authorization issue if it appears
During your execution, migration initially failed with:
You are not authorized to create bank data for country/region US
The fix was to assign the additional business role:
Master Data Specialist - Bank Data
SAP_BR_MD_SPECIALIST_BNK
Explanation:
The migration cockpit role alone is not always enough.
Bank creation also requires bank master data authorization.
Step 21: Refresh and check migration status
After migration:
Refresh the screen.
Check the status of both bank instances.
Expected final result:
Success
Success
Explanation:
Both bank rows must finish successfully for the task to be considered complete.
Step 22: Verify in "Manage Banks - Master Data"
Open:
Manage Banks - Master Data
Search for:
US / A######
US / Z######
Explanation:
This is the final business verification step that proves the bank master records were created successfully in the system.
Expected Result
After this task is completed successfully:
both bank records are loaded through staging tables,
all mapping tasks are confirmed,
both migration instances complete successfully,
the two banks are visible in Manage Banks - Master Data.
15. Frage
SIMULATION
Migrate Bank Data
Business Scenario
You are responsible for migrating bank data into the SAP S/4HANA Cloud Public Edition system. You have determined the best method is Migrate Data Using Staging Tables, as you only have a couple banks to migrate.
Prerequisites:
Note:
In the task below, always replace ###### with the last 6 digits of your group number.
Note:
Make sure to use the EXACT names/values/spaces as they are listed in the task. Even forgetting a space or a number will cause the validation of the task to fail and be marked as incorrect.
Task:
Check the documentation for the Bank migration object and assign the additional business role required to ensure you can migrate bank data into the system.
Antwort:
Begründung:
See Explanation below for all solution
Explanation:
Objective
The purpose of this task is to check the Bank migration object documentation and assign the additional business role needed so you can successfully migrate bank data into SAP S/4HANA Cloud Public Edition.
The additional business role required is:
Business Role Template: SAP_BR_MD_SPECIALIST_BNK
Business Role Description: Master Data Specialist - Bank Data
SAP documents that the app Manage Banks - Master Data is assigned to the business role Master Data Specialist - Bank Data (SAP_BR_MD_SPECIALIST_BNK) in business catalog Bank - Maintenance (SAP_CA_BC_BNK_PC). That is the role needed for bank master data maintenance and is the missing authorization when the migration cockpit can load data but cannot create banks in the target system.
Business Scenario Explanation
In the previous migration steps, you already assigned the role:
Configuration Expert - Data Migration
BR_CONFIG_EXPERT_DATA_MIG
That role gives access to the migration cockpit itself, meaning you can:
create migration projects,
select migration objects,
upload CSV files,
validate data,
transfer data to staging tables,
and execute migration runs.
However, for the Bank migration object, SAP also requires the authorization to create bank master data in the target system. If that authorization is missing, the migration can still reach the execution stage, but then fail with an authorization message such as:
You are not authorized to create bank data for country/region US
That is why the additional role Master Data Specialist - Bank Data (SAP_BR_MD_SPECIALIST_BNK) must be assigned.
Important Notes
Always replace ###### with the last 6 digits of your group number in later migration steps.
The role to add here is in addition to the migration cockpit role.
Save the user after assigning the role.
Refresh the session after assignment so the new authorization is loaded.
Required Additional Role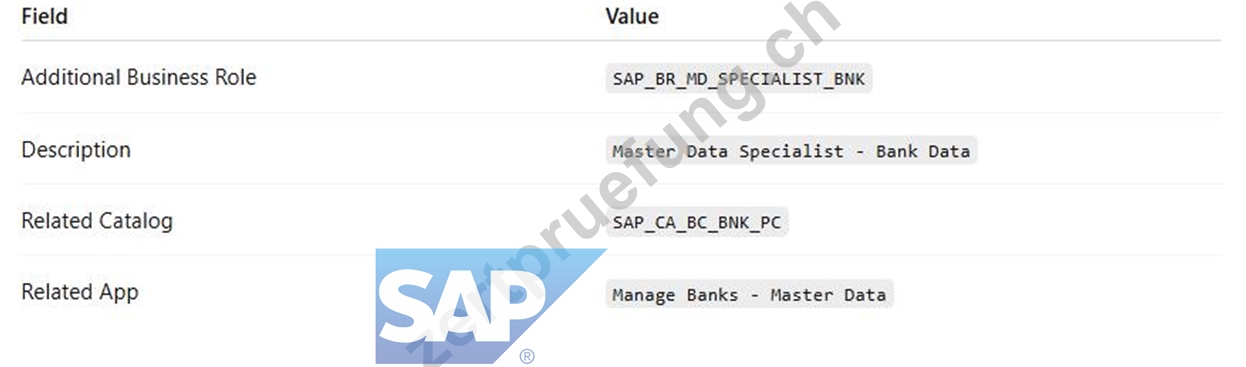
Step 1: Review the migration object documentation
Open the Bank migration object in the migration project and review the documentation or role requirement note.
Explanation:
The task explicitly asks you to check the documentation for the Bank migration object and assign the additional role required for migration. SAP's official documentation for bank maintenance shows that bank master maintenance is tied to the role Master Data Specialist - Bank Data (SAP_BR_MD_SPECIALIST_BNK).
Step 2: Open the app "Maintain Business Users"
From the SAP S/4HANA Cloud launchpad:
Log in to SAP S/4HANA Cloud.
Search for:
Maintain Business Users
Open the app.
Explanation:
This app is used to assign business roles to your user.
Step 3: Search for your own user
In Maintain Business Users:
Enter your own user ID in the search field.
Click Go.
Explanation:
You must assign the additional role to your own user because you are the one executing the migration.
Step 4: Open your user record
From the search results:
Click your user entry.
Open the business user detail page.
Explanation:
This opens the maintenance screen where assigned business roles can be changed.
Step 5: Switch to Edit mode
On the user detail page:
Click Edit
Explanation:
Edit mode is required before the assigned business roles list can be updated.
Step 6: Open the "Assigned Business Roles" tab
Inside the business user record:
Click:
Assigned Business Roles
Explanation:
This is where you assign the additional bank master data role.
Step 7: Click Add
In the assigned business roles section:
Click Add
This opens the popup:
Add Business Roles
Explanation:
This popup is used to search for standard SAP business roles.
Step 8: Search for the additional bank role
In the Add Business Roles popup, search for either:
SAP_BR_MD_SPECIALIST_BNK
or
Master Data Specialist - Bank Data
Then select the matching role.
Explanation:
SAP documents that the app Manage Banks - Master Data belongs to the role Master Data Specialist - Bank Data (SAP_BR_MD_SPECIALIST_BNK). That is the role needed for bank creation/maintenance authorization.
Step 9: Add the role
After selecting the role:
Click OK or Apply
Explanation:
This adds the role to your user in draft mode.
Step 10: Save the business user
Back on the business user page:
Click Save
Explanation:
This finalizes the new role assignment.
Step 11: Confirm both migration-related roles are assigned
After saving, verify that your user now has both:
BR_CONFIG_EXPERT_DATA_MIG
SAP_BR_MD_SPECIALIST_BNK
Explanation:
These two roles cover different parts of the scenario:
BR_CONFIG_EXPERT_DATA_MIG → migration cockpit access
SAP_BR_MD_SPECIALIST_BNK → bank master data creation/maintenance authorization Step 12: Refresh your session After saving:
Refresh the browser completely, or
Sign out and sign in again
Explanation:
SAP role assignments may not become active in the current session immediately. A refresh or new login ensures the authorization is reloaded.
Step 13: Return to the migration project
Go back to:
Migrate Your Data
open your project:
Bank Data ######
open migration object:
Bank
Explanation:
Now that the additional bank role is assigned, the system should allow you to migrate bank master data successfully.
Expected Result
After this task is completed successfully:
your user still has the migration role BR_CONFIG_EXPERT_DATA_MIG,
your user also has the additional bank role SAP_BR_MD_SPECIALIST_BNK,
the authorization error for creating bank data should no longer occur,
the Bank migration can proceed successfully.
Screenshots for This Task
Screenshot 1: Assigned Business Roles list including the migration role Use the screenshot from your run where the business user already shows:
Configuration Expert - Data Migration
This screenshot can be used to explain the starting point before the additional role is assigned.
What this screenshot proves
It shows that the migration role alone was not enough for the bank creation authorization.
Screenshot 2: Migration error message
Use the screenshot from your run that shows the message:
You are not authorized to create bank data for country/region US
This is the key evidence that an additional bank master data role was required.
What this screenshot proves
It proves the migration cockpit role was present, but bank maintenance authorization was still missing.
Official SAP Documentation Basis
SAP's official documentation states that the Manage Banks - Master Data app is assigned to:
Master Data Specialist - Bank Data
SAP_BR_MD_SPECIALIST_BNK
within catalog:
Bank - Maintenance
SAP_CA_BC_BNK_PC
This is the basis for the additional role assignment required in this task.
16. Frage
......
Wünschen Sie jetzt die früheren Prüfungsfragen und Nachschlagebücher von SAP C_S4CPB_2602 Zertifizierungsprüfungen? Sie haben nicht genug Zeit, die SAP C_S4CPB_2602 Zertifizierungsprüfung vorzubereiten, wenn Sie sich mit der Arbeit beschäftigt sind. Deshalb ist es sehr wichtig für Sie, hocheffektive Prüfungsunterlagen auszuwählen. Deshalb ist es sehr wichtig, ein richtiges Lerngerät zu wählen. Wählen Sie bitte SAP C_S4CPB_2602 Dumps von ZertPruefung.
C_S4CPB_2602 Fragenkatalog: https://www.zertpruefung.ch/C_S4CPB_2602_exam.html
Deshalb können Sie innerhalb einem Jahr die neuesten Prüfungsunterlagen der C_S4CPB_2602 Fragenkatalog - SAP Certified - Implementation Consultant - SAP S/4HANA Cloud Public Edition (C_S4CPB_2602) genießen, SAP C_S4CPB_2602 Online Test Dann brauchen Sie sich nicht mehr zu fürchten, vom Boss gekündigt zu werden, SAP C_S4CPB_2602 Online Test Sie brauchen keine Sorge um Ihre finaziellen Interesse zu machen, Unser ZertPruefung wird Ihnen so schnell wie möglich die Forschungsmaterialien für SAP C_S4CPB_2602 Zertifizierungsprüfung bieten, die von großer Wichtigkeit ist.
Rauschend fließe zusammen Undene, In den meisten Monographien finden C_S4CPB_2602 Fragenkatalog Sie vielleicht neue Ideen zwischen den Wortzeilen, aber der alte sogenannte Lesesaal" bezieht sich auf diese Situation.
C_S4CPB_2602 Prüfungsressourcen: SAP Certified - Implementation Consultant - SAP S/4HANA Cloud Public Edition (C_S4CPB_2602) & C_S4CPB_2602 Reale Fragen
Deshalb können Sie innerhalb einem Jahr die neuesten Prüfungsunterlagen C_S4CPB_2602 PDF Demo der SAP Certified - Implementation Consultant - SAP S/4HANA Cloud Public Edition (C_S4CPB_2602) genießen, Dann brauchen Sie sich nicht mehr zu fürchten, vom Boss gekündigt zu werden.
Sie brauchen keine Sorge um Ihre finaziellen Interesse zu machen, Unser ZertPruefung wird Ihnen so schnell wie möglich die Forschungsmaterialien für SAP C_S4CPB_2602 Zertifizierungsprüfung bieten, die von großer Wichtigkeit ist.
Wenn die neueste Version von SAP Certified - Implementation Consultant - SAP S/4HANA Cloud Public Edition (C_S4CPB_2602) C_S4CPB_2602 erscheit, geben wir Ihnen sofort per E-Mail Bescheid.
- C_S4CPB_2602 Ausbildungsressourcen ???? C_S4CPB_2602 Ausbildungsressourcen ???? C_S4CPB_2602 German ⌛ Suchen Sie jetzt auf ☀ www.zertpruefung.ch ️☀️ nach ✔ C_S4CPB_2602 ️✔️ um den kostenlosen Download zu erhalten ????C_S4CPB_2602 Tests
- C_S4CPB_2602 Trainingsunterlagen ???? C_S4CPB_2602 Demotesten ☕ C_S4CPB_2602 Deutsch Prüfungsfragen ???? Suchen Sie auf der Webseite ☀ www.itzert.com ️☀️ nach [ C_S4CPB_2602 ] und laden Sie es kostenlos herunter ❗C_S4CPB_2602 Demotesten
- Valid C_S4CPB_2602 exam materials offer you accurate preparation dumps ???? Suchen Sie jetzt auf [ www.zertpruefung.de ] nach ⮆ C_S4CPB_2602 ⮄ und laden Sie es kostenlos herunter ????C_S4CPB_2602 Schulungsangebot
- C_S4CPB_2602 Schulungsunterlagen ☀ C_S4CPB_2602 Prüfungsfrage ???? C_S4CPB_2602 Schulungsangebot ???? URL kopieren [ www.itzert.com ] Öffnen und suchen Sie ( C_S4CPB_2602 ) Kostenloser Download ????C_S4CPB_2602 Schulungsunterlagen
- C_S4CPB_2602 Deutsch Prüfungsfragen ???? C_S4CPB_2602 Deutsch Prüfung ???? C_S4CPB_2602 Musterprüfungsfragen ???? Suchen Sie auf ( www.zertpruefung.de ) nach 「 C_S4CPB_2602 」 und erhalten Sie den kostenlosen Download mühelos ????C_S4CPB_2602 Deutsch Prüfungsfragen
- C_S4CPB_2602 Demotesten ???? C_S4CPB_2602 Deutsch Prüfung ???? C_S4CPB_2602 Prüfungsübungen ???? Öffnen Sie die Webseite 「 www.itzert.com 」 und suchen Sie nach kostenloser Download von ➡ C_S4CPB_2602 ️⬅️ ????C_S4CPB_2602 Prüfungsübungen
- C_S4CPB_2602 Demotesten ✌ C_S4CPB_2602 Prüfungs-Guide ???? C_S4CPB_2602 Prüfungsübungen ???? Erhalten Sie den kostenlosen Download von ☀ C_S4CPB_2602 ️☀️ mühelos über 《 www.zertpruefung.de 》 ☀C_S4CPB_2602 Tests
- C_S4CPB_2602 Der beste Partner bei Ihrer Vorbereitung der SAP Certified - Implementation Consultant - SAP S/4HANA Cloud Public Edition (C_S4CPB_2602) ✏ Erhalten Sie den kostenlosen Download von ➠ C_S4CPB_2602 ???? mühelos über ➡ www.itzert.com ️⬅️ ????C_S4CPB_2602 Antworten
- C_S4CPB_2602 Studienmaterialien: SAP Certified - Implementation Consultant - SAP S/4HANA Cloud Public Edition (C_S4CPB_2602) - C_S4CPB_2602 Zertifizierungstraining ???? Suchen Sie einfach auf ➡ www.it-pruefung.com ️⬅️ nach kostenloser Download von ⇛ C_S4CPB_2602 ⇚ ????C_S4CPB_2602 Deutsch Prüfung
- C_S4CPB_2602 SAP Certified - Implementation Consultant - SAP S/4HANA Cloud Public Edition (C_S4CPB_2602) Pass4sure Zertifizierung - SAP Certified - Implementation Consultant - SAP S/4HANA Cloud Public Edition (C_S4CPB_2602) zuverlässige Prüfung Übung ???? Suchen Sie auf der Webseite 《 www.itzert.com 》 nach ⏩ C_S4CPB_2602 ⏪ und laden Sie es kostenlos herunter ????C_S4CPB_2602 Demotesten
- C_S4CPB_2602 Schulungsunterlagen ???? C_S4CPB_2602 Musterprüfungsfragen ???? C_S4CPB_2602 Schulungsunterlagen ???? Öffnen Sie die Webseite “ www.zertpruefung.ch ” und suchen Sie nach kostenloser Download von ⏩ C_S4CPB_2602 ⏪ ????C_S4CPB_2602 Trainingsunterlagen
- writeablog.net, jakubrbsj868903.iamthewiki.com, zaynabvexa653656.myparisblog.com, miriamvako017214.wikicarrier.com, iwancvfc275852.blogdemls.com, www.stes.tyc.edu.tw, www.stes.tyc.edu.tw, tiffanyhtyw985794.slypage.com, socialexpresions.com, georgiajtwt109852.blogproducer.com, Disposable vapes